Official statement
Other statements from this video 18 ▾
- □ Les images freinent-elles vraiment les performances SEO de votre site ?
- □ Quel format d'image choisir pour booster réellement les performances de votre site ?
- □ Faut-il vraiment automatiser la compression de vos images pour le SEO ?
- □ Faut-il vraiment adapter la taille de vos images selon l'appareil de l'utilisateur ?
- □ Picture et srcset pour le responsive : Google indexe-t-il vraiment toutes vos images ?
- □ Faut-il systématiquement utiliser le lazy-loading pour toutes les images en dessous de la ligne de flottaison ?
- □ Faut-il vraiment éviter le lazy-loading sur toutes vos images ?
- □ Faut-il vraiment utiliser l'attribut HTML loading pour optimiser le lazy-loading ?
- □ Les images sont-elles vraiment le principal frein à la performance de votre site ?
- □ Les images mal configurées nuisent-elles vraiment au référencement via les layout shifts ?
- □ Faut-il vraiment adapter la qualité d'image selon la taille d'écran pour le SEO ?
- □ Faut-il vraiment utiliser picture et srcset pour optimiser les images en responsive ?
- □ Comment exploiter les données structurées pour déclarer les versions alternatives d'images ?
- □ Faut-il vraiment activer le lazy-loading sur toutes les images below-the-fold ?
- □ Faut-il vraiment arrêter de lazy-loader toutes vos images ?
- □ Faut-il vraiment utiliser l'attribut HTML loading pour le lazy-loading ?
- 1:22 Faut-il vraiment migrer ses images vers WebP et AVIF pour améliorer son SEO ?
- 1:57 Faut-il vraiment automatiser la compression d'images pour le SEO ?
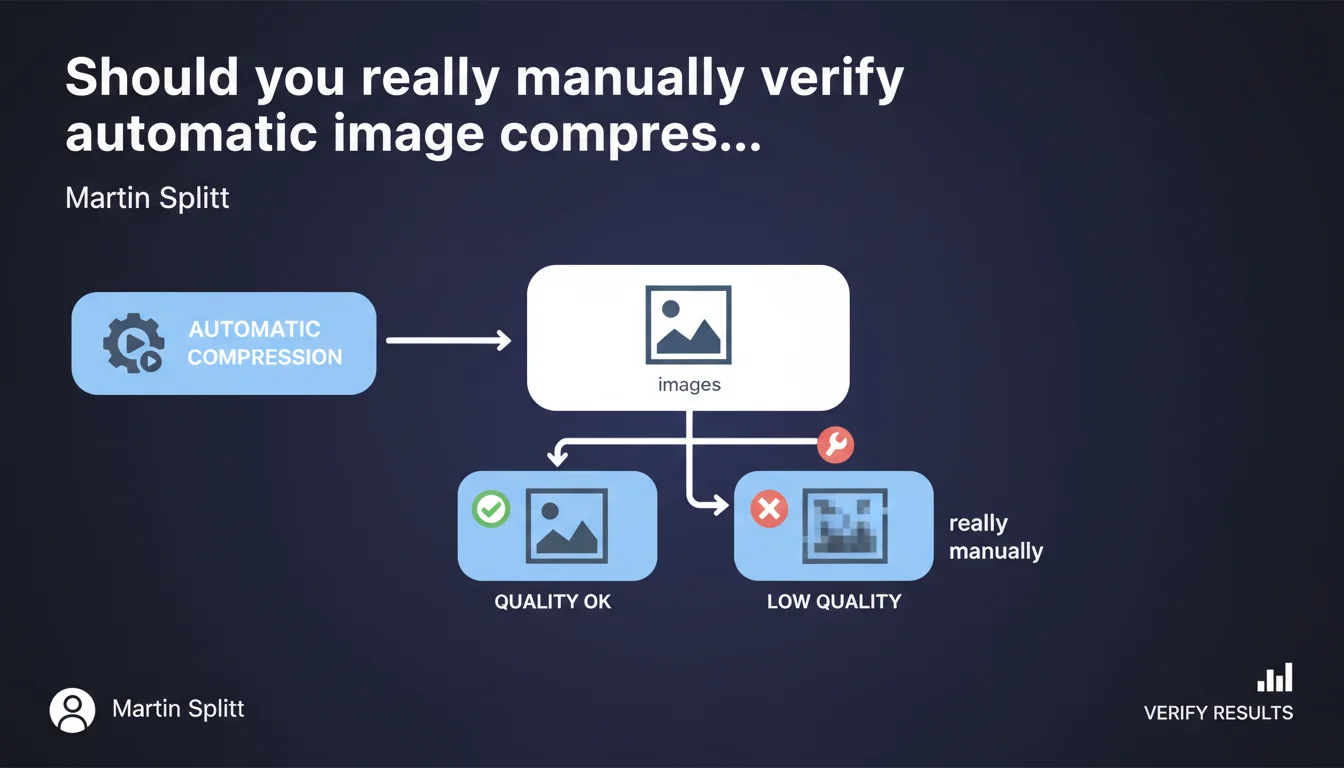
Google recommends always manually verifying results after automating image compression. Some images may lose quality and require manual parameter adjustment. Automation does not eliminate the need for human quality control.
What you need to understand
Why does Google insist on manual control of automatic compression?
Image compression is an essential technical step to optimize site performance. Automated tools — whether WordPress plugins, CDNs, or SaaS solutions — apply standardized compression algorithms.
The problem? These algorithms don't understand visual context. A product photo with fine details reacts differently than an illustrative image or graphic. Google points out here an often-overlooked truth: automation without oversight can degrade the quality perceived by users, which indirectly impacts user experience and therefore SEO.
Which images are most likely to cause problems?
Images with subtle gradients, complex textures, or embedded text are particularly sensitive to aggressive compression. Image formats also matter: a heavily compressed JPEG can create visible artifacts, while an over-optimized WebP can lose sharpness.
Brand images — logos, product visuals, interface screenshots — deserve special attention. If a user perceives a quality drop, they may question the credibility of your site.
What is the real SEO impact of poorly calibrated compression?
Google doesn't directly penalize medium-quality images, but user signals can work against you. A visitor who leaves a product page because the image is blurry generates a negative behavioral signal.
Furthermore, in Google Images results, degraded visual quality mechanically reduces click-through rates. Less traffic, less engagement — which can eventually affect your overall ranking.
- Automation doesn't understand the visual context of each image
- Brand and product images require manual adjustment of compression parameters
- Perceived quality indirectly influences user signals and SEO
- Google Images values sharp, high-quality visuals in its rankings
SEO Expert opinion
Is this recommendation consistent with field practices?
Let's be honest: most sites automate compression without ever verifying the result. Plugins like Imagify, ShortPixel, or CDN automatic optimizations do the job — but with default settings that are often too aggressive.
In the audits I conduct, I regularly see e-commerce sites with degraded product visuals that are counterproductive. Conversion rates can suffer, and Google picks up on these signals through behavioral data. Splitt's recommendation is therefore consistent with what we observe in practice.
What nuances should be added to this statement?
It depends on image volume and site type. On a blog with a few dozen visuals, manual verification is manageable. On a store with 10,000 SKUs, it's unrealistic — except for strategic images (homepage, bestsellers, landing pages).
A pragmatic approach involves defining compression profiles by image type. For example: aggressive compression for decorative banners, moderate for product images, minimal for logos and embedded text. Then verify a representative sample manually. [To verify]: Google doesn't specify whether this verification should be exhaustive or if sampling is sufficient.
In which cases does this rule not really apply?
If you use a modern CDN with context-aware adaptive compression (Cloudflare Polish, for example) and you've calibrated parameters after testing, systematic manual verification can be reduced. But beware: even the best tools can miss edge cases.
Practical impact and recommendations
What should you concretely do after automating compression?
First step: define a representative image sample. Select 20 to 30 images of varied types (products, banners, illustrations, screenshots) and compare visually before/after compression.
Use multiple screens and resolutions — a flaw invisible on a 4K screen may be glaring on mobile. Open images at 100% and check critical areas: text, sharp edges, gradients. If artifacts appear, adjust compression parameters downward for that image type.
What mistakes should you avoid during this verification?
Don't rely solely on automatic analysis tools (PageSpeed Insights, GTmetrix). These tools measure weight and technical metrics, not visual quality perceived by humans.
Also avoid over-optimizing out of fear of losing Lighthouse points. A perfectly sharp 80 KB file is better than a blurry 50 KB file. User experience takes priority over tool scores.
How do you integrate this verification into a production workflow?
Ideally, verification happens in two phases: during initial compression tool setup (calibration phase), then through regular sampling of newly added images.
For high-volume sites, create compression profiles by image category and document the settings. Train editorial teams to spot visual defects when publishing.
- Select a representative sample of 20-30 varied images
- Compare visually before/after on multiple screens and resolutions
- Check at 100% the critical areas: text, edges, gradients
- Adjust compression parameters by image type if necessary
- Document compression profiles for each category
- Integrate quality verification into the editorial workflow
- Perform regular sampling checks on newly added images
❓ Frequently Asked Questions
Dois-je vérifier toutes mes images une par une après compression automatique ?
Quels outils utiliser pour vérifier la qualité visuelle des images compressées ?
Quel taux de compression est considéré comme sûr pour la plupart des images web ?
La compression d'images impacte-t-elle directement le classement dans Google Images ?
Faut-il privilégier WebP ou JPEG pour optimiser le poids sans perdre en qualité ?
🎥 From the same video 18
Other SEO insights extracted from this same Google Search Central video · published on 02/07/2024
🎥 Watch the full video on YouTube →
💬 Comments (0)
Be the first to comment.